- Augusta University
- Accessibility
- Documents
Documents
Create accessible electronic documents, no matter what format
When creating electronic documents, you should strive to make the documents accessible to and inclusive of the widest-possible audience. The basic guidelines included in this section help provide a base level of accessibility when creating most types of electronic documents, including Microsoft Office, PDF, and other document formats.
Accessible documents are:
- Scannable: Readers can quickly scan a document to find out what it contains.
- Searchable: Readers can use a digital device to search for words in the document.
- Legible: Sighted readers can physically read the text.
- Readable: Readers can easily understand the messages in the document.
General guidelines for accessible documents
Each of these guidelines is crucial to create a document with a base level of accessibility:
- Provide a descriptive title
- Use appropriate language for the audience
- Arrange a clear document structure
- Provide alternative text for visual content
- Write descriptive labels for links
- Apply color sparingly
These core guidelines for accessibility should be applied to all documents, regardless of the authoring tool or software. However, individual applications of these guidelines to each document may vary based on the authoring tool used.
Checking PDFs for accessibility
Ideally, start with an accessible source document (e.g., in Microsoft Word) and export it to an accessible PDF. This preserves the document's accessibility features if it is edited in the future. If the original document is not available, accessibility features can be added to the PDF using Adobe Acrobat Pro DC.
How to check PDF accessibility
To review PDF accessibility, complete these steps by using Adobe Acrobat Pro DC:
Step 1Does document have text?
Try selecting document text using a mouse, or select all text using Edit > "Select All" from the Acrobat menu. If all text cannot be selected, then part or all of the document contains an image file and is not accessible. Convert to text using View > Tools > "Recognize Text."
Step 2Is document tagged?
Go to File Properties (Ctrl+D in Windows, Command+D in Mac). In the bottom left corner of the Document Properties dialog, see the "Tagged PDF" field. If status is "No" the document will need to be tagged. Tags provide the structure on which accessibility is built. Add tags by selecting View > Tools > Accessibility > "Add Tags to Document."
Step 3Check for other errors
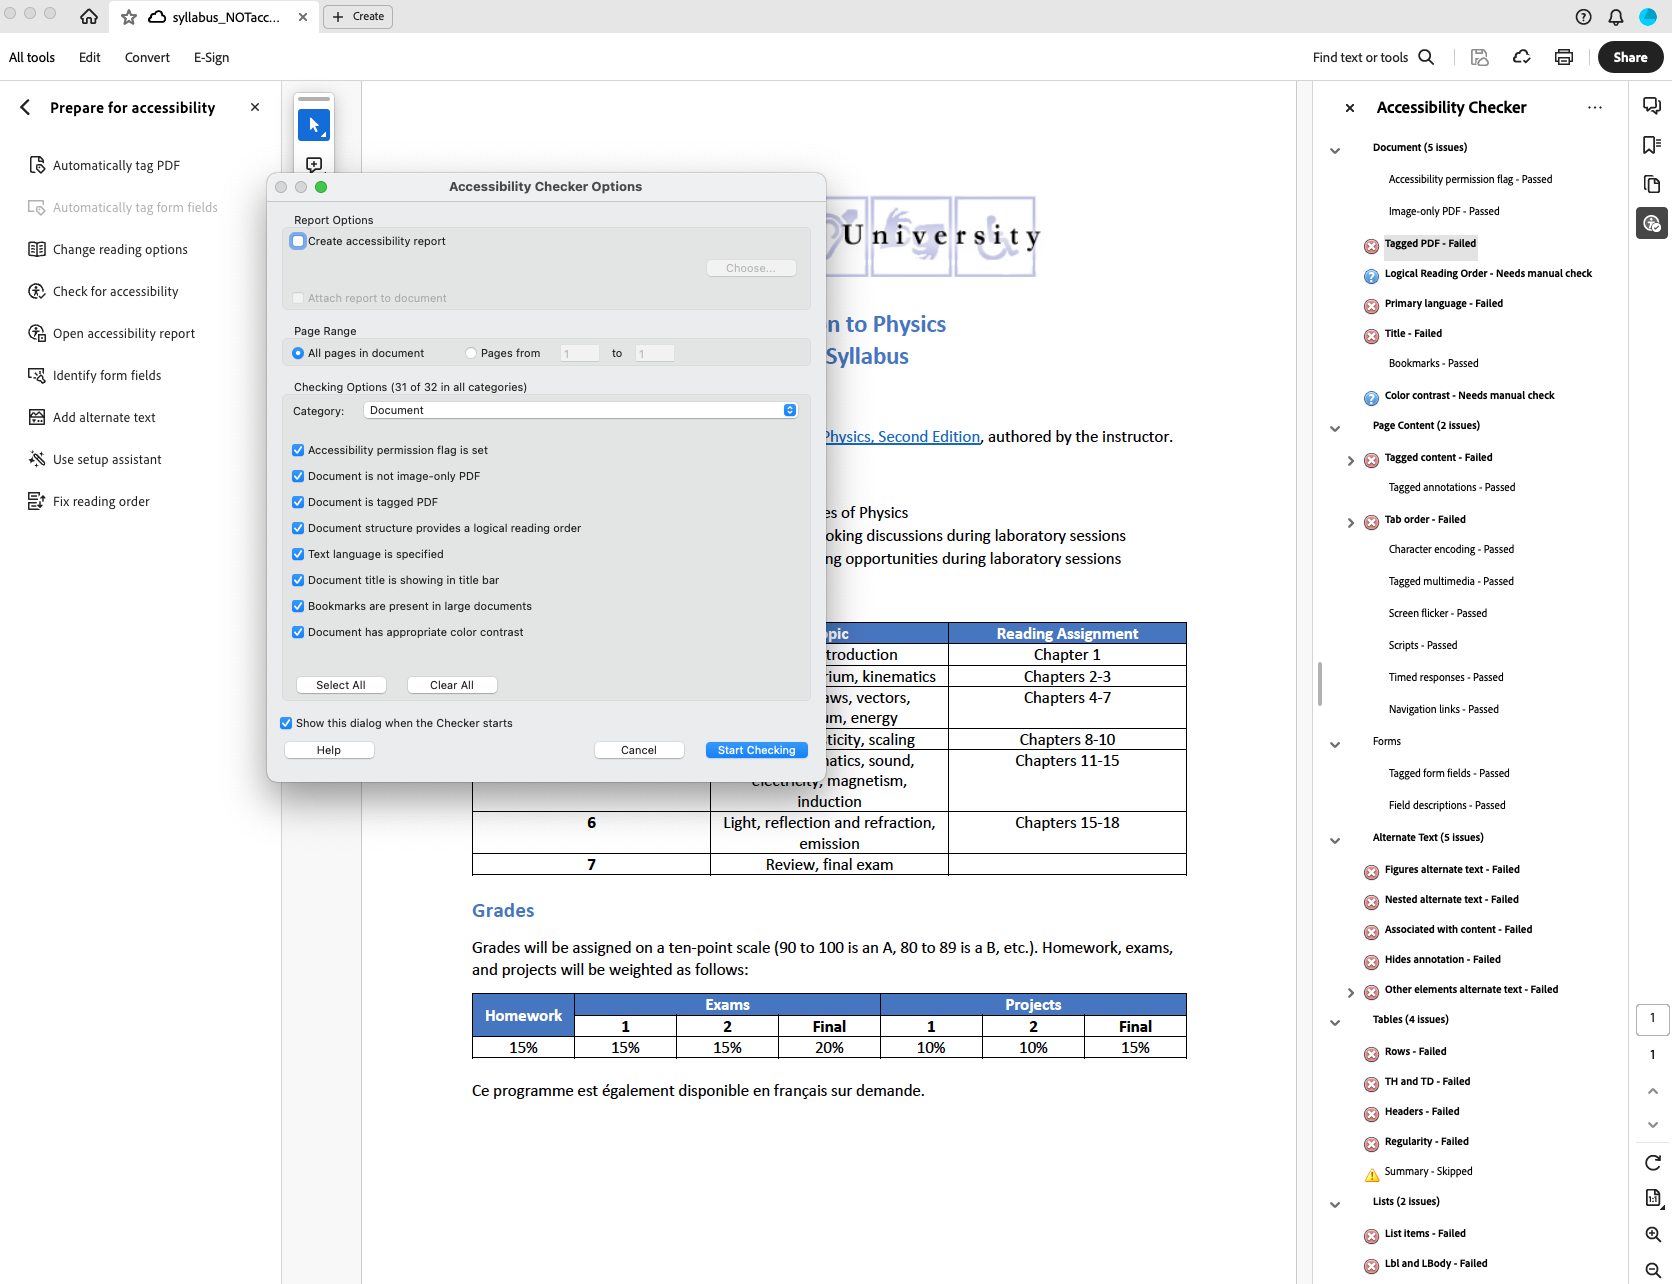
Run the accessibility checker using Acrobat Pro. Select Tools > Accessibility > "Full Check" then read the report and follow the prompts. Please conduct this step last because some documents generate dozens of errors that can easily be addressed with the first two steps.

In the image you can see the Accessibility Checker Options dialog. Once the check is complete, it displays a panel on the right that lists the accessibility issues. To fix a failed check after running the Full Check, right-click the item in the Accessibility Checker panel on the right and select one of the following options from the context menu:
- Fix: Acrobat either fixes the item automatically or displays a dialog box prompting you to fix the item manually.
- Skip Rule: Deselects this option in the Accessibility Checker Options dialog box for future checks of this document, and change the item status to Skipped.
- Explain: Opens the online Help where you can get more details about the accessibility issue.
- Check Again: Runs the checker again on all items. Choose this option after modifying one or more items.
- Show Report: Displays a report with links to tips on how to repair failed checks.
- Options: Opens the Accessibility Checker Options dialog box, so you can select which checks are performed.
Tag Tree
To manually inspect the tag tree in Adobe Acrobat Pro, select View > Show/Hide > Navigation Panes > Tags. This will display the tags in descending order. Visually inspect the tags to make sure the heading level structure is correct and elements are tagged accurately. Create and verify PDF accessibility (Acrobat Pro)
Additional Reading
- National Center on Disability and Access to Education cheatsheets
- Microsoft: Creating accessible Office files
- WebAIM: Rich media accessibility
- WebAIM: PDF accessibility
Need Help? If you have trouble implementing any of the guidelines, you can find contact resources on the Getting help page.